Model Train-related Notes Blog -- these are personal notes and musings on the subject of model train control, automation, electronics, or whatever I find interesting. I also have more posts in a blog dedicated to the maintenance of the Randall Museum Model Railroad.
2019-01-20 - Mini Wifi Camera and Train Layout Usage
Category Video
I’m continuing my exploration of what we can do using these cheap small mini cameras when it comes to train layouts, and today’s subject is this mini pinhole wifi camera. How well does it work and what can we use it for?
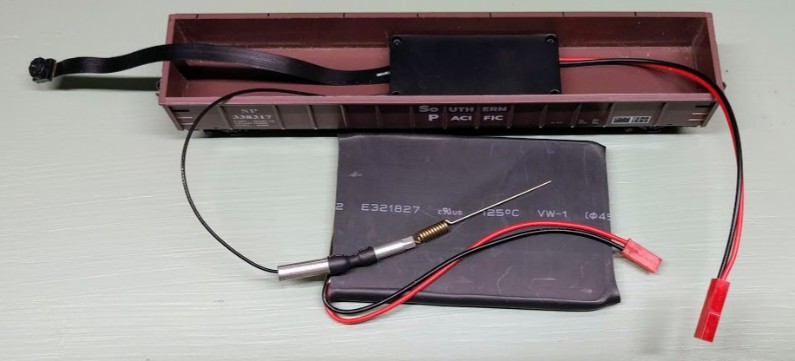
Mini pinhole camera compared to an HO-sized gondola
First of all, let’s describe the generic type of cameras we are talking about as there are a few variations available:
- The camera itself is of a pinhole type, mounted on a ribbon connector, typically 3 inches long or so.
- The body with the electronics comes either in a box (as shown above) or in a heat-shrink tube-wrap.
- These have wifi and a separate good-sized antenna.
- These typically come with a battery, most of the time external, or sometimes combined with the electronics.
If you search on Amazon, eBay, or AliExpress, a good search term is “mini pinhole wifi camera DIY” or similar. Be ready for some typical sleazy copy-paste marketing tactics and keyword bait titles. The imagery associated with them is of the most boring cliché type, and since all these vendors just copy-paste the same marketing material and specs, one has to look behind that to discern the actual specifications.
What are they good for, at least on the paper, allegedly?
For that we need goals to compare to. The usages I have in mind are:
- Creating a custom HO-sized camera car with a wifi live view.
- Monitoring hidden staging yards or hidden tracks.
- Virtual block occupancy using vision-based computer control (see previous post here).
I looked at several of these and noticed a pattern:
- A lot of these are based on “off-the-shelf“ chipsets typically used also in car dash-cams. A lot of that stuff is 5-yr old or more.
- It’s really hard to get the exact chipset spec in the vendor listings, so one needs to carefully read along the lines.
- The specs are wildly “inflated” in the vendor listings.
- Most come with a battery that is mostly pointless for the usage I have in mind.
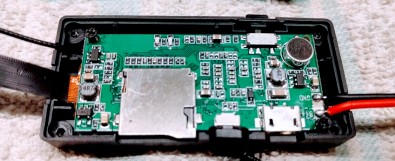
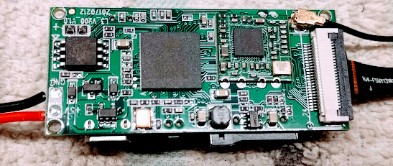
I’ll base my explanations on this model I got off Amazon https://amzn.to/2RWZ7uZ because that’s what I got, and you can extrapolate to other models. First let’s look what’s inside the box:
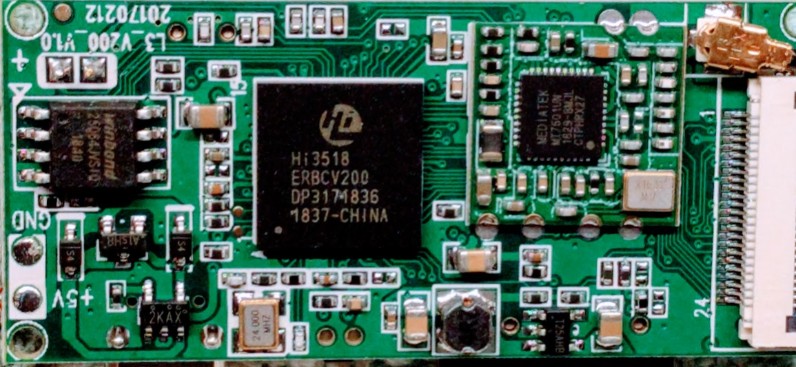
Under the hood, we have:
- IP Camera SoC (Hi 3518). The Hi 3518 SoC can handle 720p @ 30 Hz and their SDK uses Linux 3.0.
- 802.11 b/g/n single chip (MediaTek MT7601UN).
- 64Mbit SPI Serial Flash memory (Winbond 25Q64).
- Power goes through a 4.1V voltage regulator (2KAX).
- The internal battery connection is labeled as +5V.
The battery provided is a 3000 mAh, similar in size to this one.
Mode of Operation
This is an area where I was pleasantly surprised: the https://amzn.to/2RWZ7uZ is actually an IP Camera.
The default mode of operation is for it to create an ad-hoc wifi network. The documentation points to the HDMiniCam android app for Android (there’s a similar app for iPhones and I did not try it). Usage in this mode is fairly straightforward:
- Turn on the camera. It takes about 55 seconds to boot & be available.
- Select the custom wifi network created by the camera on the Android phone.
- Android tip: A few seconds later Android will notify this wifi access point does not have internet access. Click on the “stay connected” checkbox, otherwise Android will try to switch wifi networks.
- The Android app should be able to connect to the camera, configure settings, and go in live view mode.
In the ad-hoc mode, the camera is creating the wifi network. I’ve had good connection success for at least 4-5 meters (~16 feet) in straight line of sight, and connection became spotty after that.
So far, that limits usage to the cell phone app, which is not what I’m looking for.
But here’s the nice thing: in the settings, have the camera connect to your own 2.4 GHz wifi network (it does not support 5 GHz networks).
Once the camera is connected to an existing wifi network, it works as a regular IP camera. The actual IP can be found using the app settings or the usual methods (check your wifi router, nmap the network, etc.) Once the IP address is known, it’s possible to use the camera using a web browser or even using VLC according to the brochure. More on this below.
The camera also supports P2P through typical external servers. That feature can be disabled in the IP cam settings, which I highly recommend one to do right away.
Note that all of this is clearly indicated in the small brochure that comes with it, if you know how to read it.
Battery & Power
The model I got came with a fairly good-sized 3000 mAh battery, which is unfortunately quite unusable for any need I have and represents a good portion of the overall cost.
When using it as an HO-sized camera car, the battery provided is too big; however it would be trivial to swap it for a smaller sized model that fits on a HO-sized car. The case also accepts a mini USB connector to charge the camera. My goal is to get power off the rails, and feed it to a bridge rectifier / 5V voltage regulator and then be able to power the camera from the rail power. Instead of a battery, it would be better to use a large capacitor to maintain current.
When using it as a yard monitor or for block occupancy, I want the camera to actually turn on with the layout and shut off at the same time. So that’s fine -- just don’t use the battery, but unfortunately I haven’t found a single model sold without one, and it’s a significant part of the price. That said this particular camera works for that purpose as there’s a “fixed” on/off sliding button. When the power button is set to on, the camera just turns on when it gets power; it takes about 53 seconds to boot after what it starts transmitting (or the jpeg can be pulled off, as explained below). So it’s suitable for this purpose. (Other cameras such as the SQ08 / SQ11 / SQ12 / SQ13 / SQ23 series have a push-button to turn them on and another push-button to start recording, and these are not suitable for an always-on power mode).
Video Access & Quality
Sadly that’s where these cameras are all disappointing. Remember how the SQ11 is sold as a “1080p camera (720p optional)” (sic) when it’s actually a 720p only camera that can do upscaling to 1080p (with noticeable artifacts to boot)? Well here we have the same thing.
Here the main chipset, the Hi 3518 SoC, can handle 720p @ 30 Hz. There’s no mention of 1080p support for that chipset that I know of. For a chipset from 2013, that’s not surprising.
Indoors image quality rated a “passable” in my book, fairly unsaturated, lacking any crispness, and all the colors seemed rather bland. That said, for an around-the-layout live view, or to monitor a yard, it should be good enough. You won’t be reading any engine or car numbers for sure, but you’d have enough to know where things are.
One thing to remember is that this camera does not have IR LEDs, and a quick test shows that the actual camera module probably has an IR filter lens as trying to IR-flood the scene did not result in anything useful. When it’s dark, this will record merely pitch black, nothing more, and trying my best to overcompensate the contrast/gamma/luminance after the fact resulted in absolutely nothing useful.
When using the camera in IP cam mode using a web browser, the only resolution available is 1280x720.
When using the android app, there are 4 resolutions available: 240p, 480p, 720p, and 1080p. The 2 first ones show some impressive clear lack of detail. Things become clearer at 720p and 1080p and honestly the only difference I could see between them is an extremely appalling low bitrate in the former case, and a somewhat less drastic bitrate in the better case but still quite obviously low. My guess is what changes is more the bitrate, and even the “best” choice is way below my expectations. Maybe that’s why the camera worked well at 5-6 meters away in ad-hoc mode… It’s the usual wireless conundrum: distance, speed, or bandwidth -- choose two.
IP Cam & Direct Web Access
Once the camera is connected to a wifi network, it is accessible via a web browser, giving access to a fairly typical IP cam web UI on the typical http port 80.
The web UI has a few modes: browse plugin, activex, iphone specific, regular MJPEG or regular jpeg pulling.
The “non-ie” web mode uses mjpeg and a classic asp+js to show the usual ip cam UI with PTZ controls and such. One need to remember a lot of functions are not available here (no PTZ, no IR) even though they are visible in the generic IP cam web page. This mode allows one to get into the camera settings using a typical ip cam config page. From there, all the settings can be configured (network, dhcp or fixed, wifi, user/password, p2p enabled, etc).
The “android mobile phone” web mode is a direct jpeg pull using the snapshot CGI URL and a simple JS to pull that jpeg every second. Brutal, simple, and works nicely.
The URLs available are:
- http://ip/media/?action=snapshot -- Grab a 1280x720 JPEG, for example using wget, curl, etc.
- http://ip/video/livesp.asp -- The stream may be an MJPEG stream but it didn’t look like the multipart I was expecting (x-mixed-replace). I didn’t spend too much time decoding it.
- http://ip/setting.asp -- The web UI for settings.
- P2P can be disabled here
- Network > wifi > “auto reboot camera when wifi disconnected”
- System > Change Password > can set an admin password, possibly change admin username too.
- http://ip/reboot.asp -- Reboot the camera.
- The mode “Android browser that supports javascript” produces an asp page that does periodic snapshot refreshes with an index after snapshot, e.g. http://ip/media/?action=snapshot172
Why do I care? Having direct access means:
- The camera view can be used in other apps such as TinyCam or IpCamViewer on Android.
- Usage with any NVR such as ZoneMinder or Blue Iris.
- A direct view in a web browser via javascript.
- Pulling jpeg images directly to process them with OpenCV or Translate.
Where’s VLC? I wasn’t able to find a way to connect using VLC using the usual culprits (e.g. mjpeg over http) and I did not look further at this part.
Even when looking with Wireshark or reading the javascript of the web UI, I also wasn’t able to find anything that would look like an h264 stream endpoint (the Hi 3518 SoC has an h264 encoder so I was hoping I could get such a stream). That said I wonder if the Android app isn’t actually using that; I didn’t bother looking that way too much, it’s an option to explore.
Example of usage as a Live View Camera Car
This is one of my objectives, and this camera could very well work for that.
On the hardware side, my “proof of concept” looks something like this:
The mini cam in an HO-size gondola
I did a quick test using a gondola car, although a boxcar may work better to hold & hide the electronics. Having the camera on a flexible ribbon connector provides a lot more flexibility in mounting locations. The body for the electronics fits very well in there, as well as the antenna.
The only thing that did not fit was the provided battery, but another one could be substituted if desired.
However my design target is to not use a battery but instead use a large capacitor and get power directly from the track with a diode bridge and a voltage regulator.
The camera would be configured to use an existing wifi network instead of the ad-hoc mode (which I’d expect to consume more power), allowing for a better range on a large layout.
On the software / receiver side, the goal is to have a monitor or a display for the public or layout operators. Any small linux computer would work: Raspberry Pi 3, BeagleBone, or even simply an Intel Compute Stick like I have used earlier. These devices boot Linux and it is fairly trivial to make them autostart into Chromium in Kiosk mode (i.e. full screen) with a bit of javascript to pull the JPEG stream from the camera and display it. The Intel Compute Stick with its integrated wifi, convenient boxed format, and already configured Linux distro was by far the easiest to use out of the box (example of chromium kiosk mode here). If the sound of Linux makes you run away and evokes complexity to you, there’s a Windows 10 version of the same Intel Compute Stick, more expensive and with better specs just to be able to boot Windows and allow your visitors to see at which frequency mandatory Windows updates are required, a problem that does not even exist on the Linux side.
Form Factor and Other Usages
Compared to other types of cameras I’ve played with, I end up liking the “pinhole ribbon” style. In this case we have a fairly small camera module (about a quarter inch in size) and about 3-4 inches of ribbon. I realized this would be very convenient to be able to put cameras on the layout as part of the scenery. For example place the camera in a building, and then place the electronics body under the layout, getting power from any nearby power bus.
In a place like the Randall layout, a few of these could be mounted at different places such the top of the mountain or the places far from the visitors, providing them better views. Then a computer with a display, as previously mentioned, could just display the various cameras either in sequence or when motion is detected.
That said, even for that usage I would still want a slightly better video quality and a bit more saturation and better colors.
Conclusion
All-in-all, that’s a fairly capable camera if one can accept a 720p image of passable quality at best. This is not suitable to make high quality 4K or even 1080p videos on youtube, but it’s definitely good enough for the other kind of usages I have in mind:
- Monitor remote yard / hidden staging (just be wary that these have poor low-light performance, but that can be easily fixed by adding a LED strip in the staging area to be monitored).
- Build a camera car for live view (just would like a slightly better video quality).
- Provide visitors views of the layout (also would like a slightly better video quality).
The downside is that, as with many other similar products, the title claimed are just complete marketing BS. “1080p” or “night vision” in the title are just pure keyword stuffing as these products have no merit in those areas (note that a few of these have a camera module with 2 or 4 small IR LEDs, in which case it may work, I haven’t tried any).
And to finish, I’d like to mention again how inaccurate titles are a real problem with these. There’s another model of similar-looking pinhole wifi camera circulating on eBay or AliExpress that has the battery integrated with the electronics in a heat-shrink package; although generally listed as a 1080p in the title, the specs have the fantastic claim of being a “Video Resolution Ratio: 640x480 VGA, Network Transmission Resolution Ratio: 320x240 QVGA, Video Frame Rate: 10fps”. This kind of discrepancy should be enough to keep one away for that product. If there are specs, read them! And if they seem inaccurate, they likely are.


