The Randall Museum in San Francisco hosts a large HO-scale model model railroad. Created by the Golden Gate Model Railroad Club starting in 1961, the layout was donated to the Museum in 2015. Since then I have started automatizing trains running on the layout. I am also the model railroad maintainer. This blog describes various updates on the Randall project and I maintain a separate blog for all my electronics not directly related to Randall.
2021-04-18 - Randall Repairs: Block B320
Category RandallAffected |
Mainline block B320 (outside) from Stockton Station to Sonora. |
Description |
Dead spot after the cantilever signal bridge. |
Summary Fix |
Broken solder on outside rail. |
Description of Issue
Today we’re fixing a dead spot that appeared out of the blue on the mainline, in the middle of block B320, right were engine 1201 is on this picture:
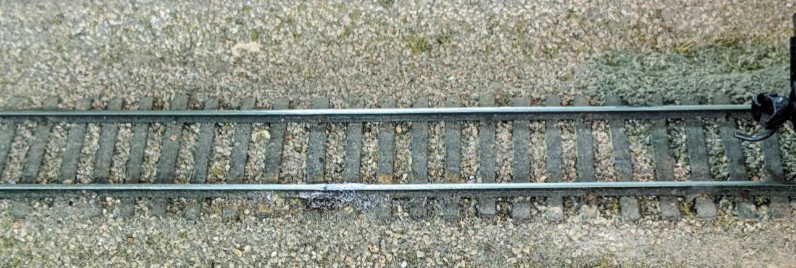
Initial inspection shows there’s nothing interesting there. It’s the middle of the block. Closer inspection gives a different story; one may even say this spot had a story to tell:
On the left there’s an uncoupler. Under the layout, I noticed there is an electromagnet uncoupler, which has been cut off. That may seem odd for a mainline, however apparently it used to be ordinary for this layout -- several over mainline turnouts show they had electromagnetic uncouplers after the siding turnouts.
Next to it is a guard rail on the outer rail. Jim posited this means it used to be a turnout. And indeed we can see the remnants of tie marks in the middle between the two tracks, as well as what used to be holes for turnout points in the middle of both tracks a bit farther on each side. Under the layout, there’s a square piece of wood such as these typically used to align the old Fulgurex turnout motors.
On the right side there’s a very small kink in the track. I could not tell whether it’s two rails joined together, or a broken rail. All I can tell is that just by pushing on it very slightly I was able to “fix” the dead spot. There was no solder on that spot so I don’t think it used to be a rail joint.
Description of Fix
Interestingly, looking at the oldest layout map I have, it seems this location was more or less the junction between the blocks 310 and 320. Today that junction is a few feet on the right by the concrete overpass bridge.
Thus it seems there might have been a turnout here at some point. I don’t know how far long ago. I do see also something that may look like a block gap in the other track around the magnet. And according to that one map of unknown origin, date, and accuracy, it was the previous block limit. Each time I look at this layout, I feel like I’m doing some kind of archeology research.
Anyhow, I’m going for broken rail so the fix was to solder on the outside of the rail. The whole spot is just barely out of reach thus this was all done at arm length with a cantilever signal in the way too to make things just a tiny bit harder. My solder ended up being passable, however it seems to be holding for now.
I also sanded the spot on the top and inner side of the rail to ensure it was smooth. Testing with a rail car, it seemed fine.
I do realize that to be more flexible, I might have opted for a “bond wire” approach (a short wire with two solders, one on each side of the breakage). I’ve done that in other parts of the layout which were more accessible and where it was clear the gap was due to rail joints. The bond wire approach means the solder joint won’t break right away at the next heat expansion cycle, whereas this one might. We’ll see. If it happens again, I’ll try that. Assuming I can reach the spot somewhat adequately.
Fix time: 2 hours.


