Electronics: Cab Throttle |
2016-01
This describes the electronics behind a little project I did for the Golden Gate Model Railroad Club at the Randall Museum in San Francisco, back in 2015.
The project in itself was to provide the club with a way to run their Junior Engineer Days using DCC.
Some background: the club's layout could be operated in both DCC and DC. Daily operations were always done in DCC mode and DC mode was only used for the bimonthly Junior Engineer Day event.
During that event, the layout was switched back to DC and kids were given a custom made analog throttle to run the trains. The adult operator supervising the kids would ask them which of 2 trains sitting at the station the kids would want to run, turn on the corresponding blocks and turnouts and kids would run the train forward for half the layout. Once the train reached the back, it would end up in another block controlled by another operator who would bring back the trains to their starting position. That was made possible by the fact that different DC blocks could be operated by different analog throttles.
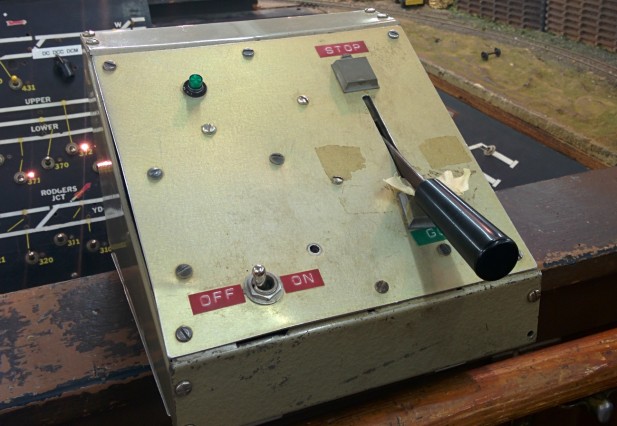
The kids operated their selected train using this analog throttle -- this is actually a custom made "transformer pack" that directly powered the block:
Some member would have liked to keep running the layout in DCC but that was not possible since they did not have a suitable way to control the trains. The club uses NCE and it was not deemed satisfactory to handle an expensive NCE ProCab to small kids. The throttle used had to be the most simplistic and sturdy possible.
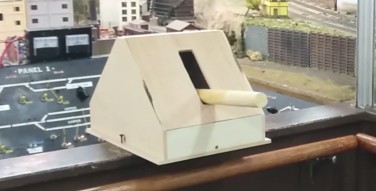
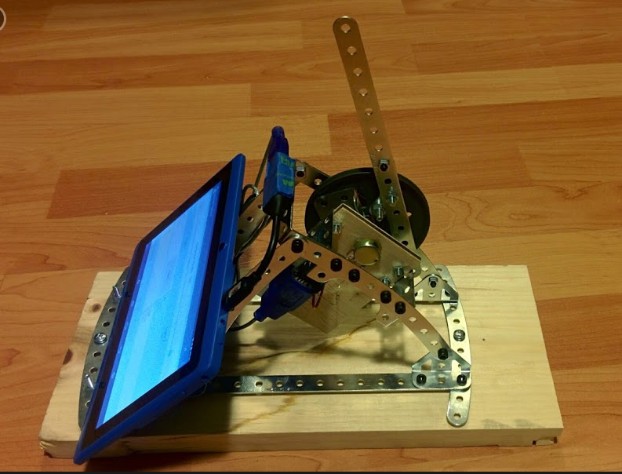
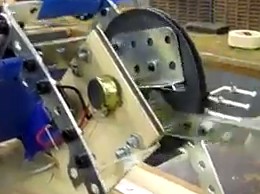
So how could we run this using DCC? One goal was to keep it simple for kids, which means not giving them something complicated like an NCE Cab Throttle with tons of knobs or buttons. I came up with this design, with a prototype made using an Meccano set followed by a wooden version:
This of course was the tip of the iceberg. This is the part of the project that the club members focused on because it was the obvious and visible part. The whole workflow was in fact a bit more involved:
- A Raspberry Pi running JMRI and an NCE USB interface connects to the NCE cab bus.
- The Raspberry Pi connects to a custom private wifi network and provides a WiThrottle server.
- The throttle is made of an Arduino that communicates to an Android tablet which in turns communicates with JMRI using the WiThrottle protocol over wifi.
My project had a larger background. In the actual implementation I had 2 tablets and the operator in the back could see the status of the main throttle and override it at any time. The end goal was for the software on the tablet to also control the turnouts to select which trains were leaving the stations. I'm not describing this part here and only focusing on the throttle.
Hardware Part
This is actually the simplest part of the project.
So first the obvious question: was an Arduino and an Android tablet needed for this project? In short, yes and no.
No because if all one wants is to get that kind of design with a big lever in a big box, the simplest approach is to take something like an NCE ProCab or an Engineer Cab and "kitbash" it into a larger throttle with a big lever.
Internally the NCE throttle is very simple, it's very easy to disassemble a ProCab and NCE even provides us with the reference to replace the encoder by ourselves, it's all in the documentation! So essentially one could imagine a wooden box with a ProCab mounted on one side and the wheel encoder being offset on the other side of the box with a short cable in between.
If all I wanted was a purely standalone solution without the JMRI control, I'd totally go that route now. When I started this project I didn't realize the NCE hardware was so simple and hackable.
However part of the project goal was to take advantage of what JMRI could bring and in this case there was some clear value to it (selecting which train runs by address, setting the turnouts, etc.)
One goal in that project was to keep hardware to a minimum and move most of the logic at the software level which it's easier to control and modify. For that, having something that talks to JMRI is useful. The tablet is a perfect interface for the operator who can use it to select the trains that kids will run and monitor the state of the system.
My first prototype was made using a Meccano set, a potentiometer and an arduino connected to the tablet:
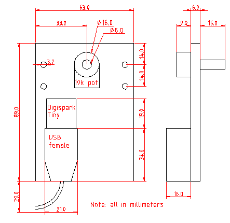
The latter version is simply a wooden enclosure on top of that, with a wooden lever.
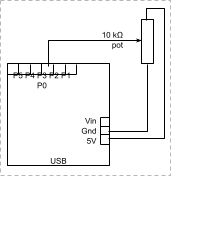
And the schematics are really simple:
I used a Digistump Digispark Tiny, which is about the size of the USB plug that it connects into.
That's all the electronics needed here and this assemble basically forms an encoder wheel.
The Digispark Tiny is a very very small electronics board composed of Attiny85 microcontroller with an USB male plug and a few I/O pins. The whole thing is 19 millimeters wide and actually smaller than the USB female plug I was using to connect it. (The actual name is "Digispark" but since the vendor made several various after, I keep calling the original the "Tiny" because I think it properly describes the form factor). The other thing is that it's really cheap -- less than $10 [Edit: back in 2015, that was about the cheapest Arduino clone I could find. Things have changed since then]. The board has 5 I/O pins and in this case 2 of them are used for the USB. That left 3 of them and here we just needed one analog input so we're fine.
Because the USB communication is done in software, it uses 2 pins to drive the D- and D+ and means the USB capabilities are very very limited. In this case that worked to my advantage as all I wanted was to drive it from an Android program running on the tablet without having to deal with too much USB protocol overhead. That was accomplished by treating it as a serial port and exchanging single characters.
Now back to the hardware. What we want is read a lever position. In this case I used a potentiometer mounted on the axis of the lever. I used a 10 kΩ potentiometer as can be seen in the diagram above. My very first design had an extra 1 kΩ on serie with the potentiometer but that was pretty much useless.
One thing one always want to do in electronics, and which I see annoyingly missing in many arduino web pages, is to check voltage levels and compute power dissipation and currents. When you see any web page telling you how to connect an LED to an I/O pin without a resistor in serie, that's a good indication the person has no clue what they are doing (unless they explicitly tell you the LED has an internal resistance).
In this case we need to compute two very simple things up front.
We're using a potentiometer that can do from 0 Ω to 10 kΩ on the middle pin, so we need to care how much current that will draw. For that we just need to look at the ATtiny85 datasheet and we learn on page 129 that the analog input circuitry is optimized for analog signals with an output impedance of approximatively 10 kΩ or less so we're fine on that side. We also learn that the ADC is 10-bits, like pretty much all Arduinos.
Now all we have to measure is whether our 10 kΩ potentiometer is appropriate for the voltage used. When looking at the schema above, we can clearly see that no matter how much the potentiometer is turned, the resistance between ground and 5V is always 10 kΩ. We simply need to compute the current that it would draw and the power dissipated:
- U = R . I -- we're going to have 5 V and 1 kΩ resistor so current I = U / R = 5 / 1000 = 5 mA.
- P = U . I = U . U / R = 5 * 5 / 1000 = 25 mW.
So we'll be fine using ¼ or ⅛ W resistors and based on the Digispark quickref here we can draw 5 mA easily from the 5 V pin. From that quickref we can also learn there are some I/O pins to avoid and we'll be using pin 2 which is ADC channel 1. Since it's a 10-bit ADC, we'll be reading values between 0 and 1023.
Arduino Program
Programming is done using the Digispark-specific version of the Arduino IDE and using this program:
#define USB_CFG_DEVICE_NAME 'D','i','g','i','T','h','r','o','t' |
Let's explain:
- Setup configures pin 2 into an input.
- Loop waits to read a "b" or "t" character on the USB fake serial port.
- When it sees a "b" character, it just blinks the led.
- When it sees a "t" character, it performs 4 analog reads, averages them, and writes back the value as 4 digits in decimal on the USB port.
So that's our communication protocol. The tablet needs to open the USB communication, repeatedly sends a "t" character ("t" as in throttle) and reads 4 digits that form a 0..1023 value.
Android communication with the Digispark/Arduino
That was the part which took the most time to figure out. I was not exactly familiar with the inner works on USB or OTG. I have some vague understanding of how USB drivers are configured but that doesn't mean I knew how to write one. Turns out in fact none of this was needed to understand what was going on.
Here's a non-watered-down version of a post I wrote on the Digispark forum, in case it helps somebody else:
https://digistump.com/board/index.php?topic=1675.0
The first thing is to be able to is to discover the Digispark device on the Android USB port.
This can be easily be done as follows using the Android UsbManager API:
private static final int DIGISPARK_VID = 0x16C0; private static final int DIGISPARK_PID = 0x05DF;
private void listDevices() { UsbManager manager = (UsbManager) getSystemService(Context.USB_SERVICE); HashMap<String, UsbDevice> devices = manager.getDeviceList(); for (UsbDevice device : devices.values()) { if (device.getVendorId() == DIGISPARK_VID && device.getProductId() == DIGISPARK_PID) { mDevicesList.add(device); } } } |
We can add the device to an ArrayList-backed ListView or RecyclerView or use it directly.
Since we're talking about an Android phone or tablet, in most cases there won't be any hub involved so we can pretty much stop iterating after we find one -- in our use case of a fixed cab throttle, we know the hardware and there can't be more than one!
An important detail to remember is that a Digispark Tiny exposes 16D0 / 0753 as VID/PID during its 5 first seconds (for the programming bootstrap) and the VID/PID changes after to 16C0 / 05DF (software USB). This can be ignored, except if that combo is seen more than 5 seconds, we're probably dealing with a Digispark that hasn't been programmed yet. Sometimes it's good to take a generic approach (which is why I document it here) but we need to keep our specific application in perspective -- there's a single USB device and we know it will be properly programmed.
Now one trick is that once we find an UsbDevice instance, we can't quite use it right away. We need to ask permission to the user to use it. This is done by sending a PendingIntent. Android displays a dialog box asking for permission to the user and once granted we get the intent back. We can use any kind of BroadcastReceiver and in my case the easiest thing was to send it to my own activity:
private static final int REQ_USB_PERMISSION = 1;
public void onUserClickedOnDeviceEntry(@NonNull UsbDevice device) { UsbManager manager = (UsbManager) getSystemService(Context.USB_SERVICE);
Intent in = new Intent(context, MyActivity.class); Uri u = new Uri.Builder().scheme("usb").path(device.getDeviceName()).build(); in.setData(u); in.putExtra("device", device); // Parcel PendingIntent pi = PendingIntent.getActivity(context, REQ_USB_PERMISSION, in, PendingIntent.FLAG_UPDATE_CURRENT); manager.requestPermission(device, pi); } |
Note that a PendingIntent must be unique and the extra data is ignored for that purpose. Using the device usb path as a URI is a convenient way to make a unique intent for that specific device. On the receiver side we could lookup the usb device path again but it's just easier to parcel the device info into the intent as extra data.
And once the user grants the permission:
@Override protected void onNewIntent(Intent intent) { super.onNewIntent(intent); if (intent != null && intent.getData() != null && "usb".equals(intent.getData().getScheme())) { UsbDevice device = intent.getParcelableExtra("device"); if (device != null) { onDeviceSelected(device); } } } |
OK now we have a device and we have permission to use it. So how do we use it?
That's where I stumbled quite a bit at first. I started digging into the USB protocol and interfaces, end-points and control vs bulk messages, then I realized I had the answer right under my nose: what does the Windows DDK usbview report about a digispark? And what does digiusb.c, the little C client provided to communicate on the desktop, does?
Pro tip: if you want to know how an USB device is structured, grab the Windows Kits 8.1 and run Debuggers\x86\usbview.exe; that will list you all the interfaces and endpoints of a device.
In this case the Digispark Tiny has one interface and one end-point. There's a stack-overflow linked in another post of the Digispark forums that makes a bit deal of iterating through interfaces and end-points and figuring their direction. It turns out this information is actually quite irrelevant. Same as above, we just don't need any of this with the Digispark Tiny!
Yes, even if you know all about interfaces and USB end-points, that's totally useless here.
To understand why, simply look at the little digiusb C program that comes with the Digispark.
What does it do?
From digiusb/send.cpp, it writes character per character using control messages:
devHandle = usb_open(digiSpark); numInterfaces = digiSpark->config->bNumInterfaces; // ⇒ 1 interface = &(digiSpark->config->interface[0].altsetting[0]); // ⇒ 0 /* result = usb_claim_interface(devHandle, interface->bInterfaceNumber); */ result = usb_control_msg(devHandle, (0x01 << 5), 0x09, 0, argv[1][i], 0, 0, 1000); // * N result = usb_control_msg(devHandle, (0x01 << 5), 0x09, 0, '\n', 0, 0, 1000); // EOL result = usb_release_interface(devHandle, interface->bInterfaceNumber); usb_close(devHandle); |
The interface is used to claim and release the device, however the claim part is commented out in the code and the interface itself is never used to send data.
From digiusb/receive.cpp:
Loop: theChar = 4 result = usb_control_msg(devHandle, (0x01 << 5) | 0x80, 0x01, 0, 0, &thechar, 1, 1000); if result < 0: break; if theChar == 4 (not changed): break; |
From linux usb.h:
int usb_control_msg(usb_dev_handle *dev, int requesttype, int request, int value, int index, char *bytes, int size, int timeout); |
- requestType: 1<<5=x20 for send,1<<5+x80=xA0 for receive.
1<<5 = USB_TYPE_CLASS; 0x80=USB_DIR_IN, 0=USB_DIR_OUT - request: 9 for send, 1 for receive.
- value: 0
- index: char to send, 0 for receive.
- bytes ptr: null for send, &char for receive.
- bytes len: 0 for send, 1 for receive.
- timeout: 1000.
So what's going on here? It is using "control messages", a mechanism from the USB spec done to communicate with a device directly without having a proper channel (based on my cursory very limited reading of the spec). And by default control messages are sent to the end-point 0. So basically we can ignore we have a HID compliant device and since we know it's a Digispark, we can hack away.
I've listed the usb_control_msg API above from usb.h because, you've probably guessed it, Android has exactly the same function, argument for argument on the Android API side:
public static final int REQ_OUT = UsbConstants.USB_TYPE_CLASS + UsbConstants.USB_DIR_OUT; public static final int REQ_IN = UsbConstants.USB_TYPE_CLASS + UsbConstants.USB_DIR_IN;
UsbManager manager = (UsbManager) context.getSystemService(Context.USB_SERVICE); UsbDeviceConnection cnx = manager.openDevice(device);
// Send character 'A' cnx.controlTransfer(REQ_OUT, 9, 0, 'A', null, 0, 1000);
// Read a character byte[] buffer = new byte[16]; buffer[0] = 4; res = cnx.controlTransfer(REQ_IN, 1, 0, 0, buffer, 1, 1000); char c = (char) buffer[0]; if (res >= 0 && c != 4) ... use character c
|
Obviously since we're reading character by character, we need to deal with \n if they are important for our application. Also we don't want to do that work on the app main UI thread -- always use a thread, or even easier an AsyncTask to do the work.
Here's an example of usage from something that blinks the led of the digispark and reads a value from the ADC:
private class CalibrationTask extends AsyncTask<UsbDevice, Void, Void> { private int mMin; private int mMax;
@Override protected Void doInBackground(UsbDevice... params) { UsbDevice device = params[0]; mMin = 1023; mMax = 0; publishProgress();
UsbManager manager = (UsbManager) MyActivity.this.getSystemService(Context.USB_SERVICE); UsbDeviceConnection cnx = manager.openDevice(device); // handle openDevice failure as needed for your application
while (!isCancelled()) { try { Thread.sleep(250 /*ms*/); doBlink(cnx); int v = readValueSync(cnx); if (v >= 0 && v <= 1023) { if (v < mMin) mMin = v; if (v > mMax) mMax = v; } publishProgress(); } catch (InterruptedException e) { return null; // interrupted on cancel } } return null; }
@Override protected void onProgressUpdate(Void... values) { super.onProgressUpdate(values); // update the UI here; } }
public static final int REQ_OUT = UsbConstants.USB_TYPE_CLASS + UsbConstants.USB_DIR_OUT; public static final int REQ_IN = UsbConstants.USB_TYPE_CLASS + UsbConstants.USB_DIR_IN;
private void doBlink(@NonNull UsbDeviceConnection cnx) { cnx.controlTransfer(REQ_OUT, 9, 0, 'b', null, 0, 1000); cnx.controlTransfer(REQ_OUT, 9, 0, '\n', null, 0, 1000); }
/** Reads digispark value. Blocks till gets the reply. */ private int readValueSync(@NonNull UsbDeviceConnection cnx) throws InterruptedException { // send t + \n cnx.controlTransfer(REQ_OUT, 9, 0, 't', null, 0, 1000); cnx.controlTransfer(REQ_OUT, 9, 0, '\n', null, 0, 1000);
// read numbers back till we get \n byte[] buffer = new byte[16]; int value = 0; int res; while (true) { buffer[0] = 4; res = cnx.controlTransfer(REQ_IN, 1, 0, 0, buffer, 1, 1000); char c = (char) buffer[0]; if (res < 0 || c == 4) { return -1; } if (c == '\n') break; if (Character.isDigit(c)) { value = value * 10 + (c - '0'); } }
return value; }
private void onDeviceSelected(@Nullable UsbDevice device) { mCalibTask = new CalibrationTask(); mCalibTask.execute(device); }
|
Note that this conveniently provides part of the "calibration task" I implemented on the tablet. The hardware has a potentiometer which value changes when the cab throttle is moved. However the potentiometer can turn almost 270° to provide its full range whereas the lever only moved by about 90°. Depending on how it's mounted, it will thus give a minimal and maximal value in the full 0..1023 range. That's what the calibration does: it's accessed via settings and can be used to record the min/max values that can be read. The Android app then stores that in settings and this provides the full speed range of the throttle.
I hope that will be useful to some of you.
~~
~~
