The Randall Museum in San Francisco hosts a large HO-scale model model railroad. Created by the Golden Gate Model Railroad Club starting in 1961, the layout was donated to the Museum in 2015. Since then I have started automatizing trains running on the layout. I am also the model railroad maintainer. This blog describes various updates on the Randall project and I maintain a separate blog for all my electronics not directly related to Randall.
Recently I was using a DIY “voltmeter car” to measure the NCE Boosters Voltage Levels. That’s how I found one of the boosters had the wrong voltage setting. I’m still getting sporadic reports of power loss in the mountain, and I ordered a RRampMeter to investigate this in more detail, yet in between I thought it would be nice to have an actual static display of the boosters’ voltage so I made this:
The design is fairly simple:
- 4x AC-DC Converters
- 4x DC Voltage Displays
- 1x 3d-printed case https://www.tinkercad.com/things/8XPdA7QdPjB-quad-display-voltage
Click here to continue reading...
I have just added this control switch to the automation computer:
What the heck does that even do? Well, it’s rather simple, really: the mainline in front of the main station has 2 tracks, and one of the automated trains is parked on the mainline 2nd track. That’s right. I park one of the automated trains right on the mainline. Unfortunately that prevents the Saturday Operators from exiting the yard using the 2nd track, which makes things “interesting” when we have a lot of traffic. If only I could program the computer to move that train occupying the 2nd track when it’s not in use!?
Well that’s exactly what I’ve done, and here’s a video of this in action:
And it’s not a complicated task, right, right ?
All this automation has to do is move the freight engine a bit, clear the block to the siding, throw the switch, and reverse in the siding. Without hitting the passenger train already stored there. And then throw back the switch.
Now imagine you’re doing that, but with your eyes closed, without looking at the trains, nor really knowing where they are precisely -- wild guesses are accepted. That’s how the automation proceeds. And you need to cover all the contingencies that could potentially arise, even the ones you have not thought of before, otherwise some of the Saturday Operators will rant at you. Oh, and at the end of the day, the automation needs to put the train back where it belongs, so that the normal automation can resume the next day. Oh, and the thing also needs to work even if one of the trains is missing or broken. Within reason.
Now to be fair, this is not a new idea. I got this idea back in…
Click here to continue reading...I have continued fighting with the Trolley Automation. A couple months ago, I fixed the turnout where the Orange Trolley kept losing power. However, that did not solve the reliability problem -- the Bowser streetcar just doesn’t run reliably. There’s nothing wrong when I try the LokSound decoder on the bench, but it just doesn’t always start, and it often does not stop. Not a good thing when I’m trying to automate something!
Instead, I swapped it for this Bachmann #6119 Streetcar:
The software part of the automation uses my “Software Defined Block” (SDB) on the ESP32; this gets the distance sensor data and simulates track occupancy. That is published to JMRI using MQTT. My RTAC automation controller software then uses the track occupancy data to control the trolley’s movement.
Here’s a video of the trolley in action:
Now the running characteristics of this trolley are a bit primitive. There’s no sound, and light is minimal. The motor is fairly crude, doesn’t run well at low speed, and it has a distinctive gearing now. Yet it runs reliably, and that’s important for a daily automation routine!
2024-04-24 - Fairfield Scenery
Category RandallOrion just completed this scenery project in Fairfield:
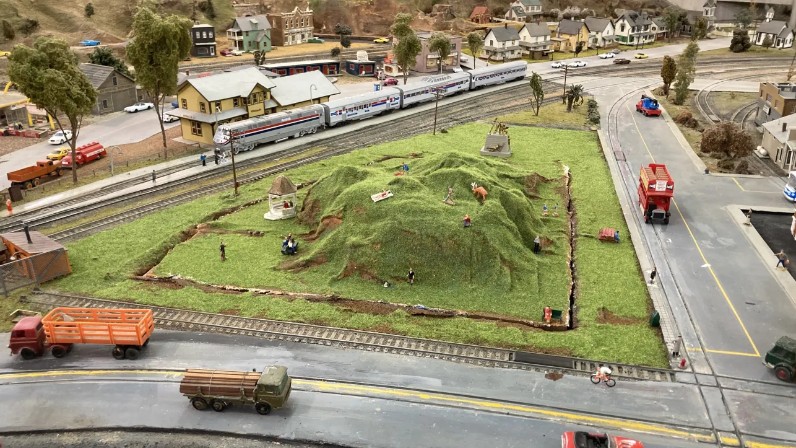
This used to be -- and is still -- an access hatch. I cut a piece of plywood a while ago of the right size, and Orion designed and added scenery to be easy to lift and move away as needed. He made the hill out of paper with a cloth surface, then painted, with grass and details glued in place.
This being California, we can see the clear fault lines around the park. That makes it easier to remove the access hatch.
Click here to continue reading...
The trolley automation regularly stops on this turnout:
This is definitely one of these Atlas turnouts where the frog is isolated. One way to handle these is to power the frog by placing a little screw and then soldering to it -- the metal of the frog is such that solder won’t stick to it easily as far as I know. There’s a little hole next to the frog that makes contact with the frog. I didn’t have a screw that would fit that, but I had some electrical wire of the adequate size. Also right now, we’re not going to run through the thrown leg of that turnout, so…
Click here to continue reading...
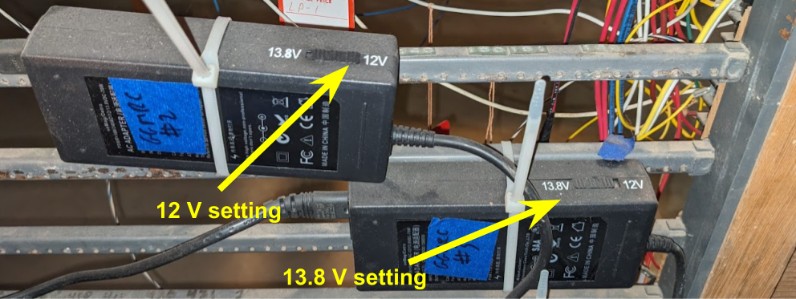
After noticing that one of the NCE boosters had a different output voltage, I double checked the setup. We do indeed use NCE PB5 boosters, and their power brick has a switch for 12 V (N scale) or 13.8 V (HO scale). One of them was incorrectly set on 12 V.
That was enough to fix the voltage issue on the track:
Click here to continue reading...
With Allen, we used the new “voltmeter car” to measure the DCC voltage on the track at different spots. As expected, the voltage varies by booster somewhat, and then I got an interesting surprise.
Booster 1 |
13.1 V |
P1 V1 (Valley1), P1 STKYD |
Booster 2 |
10.8 V |
P2 V2 (Valley2), P2 NAPA, P2 TOWN LODI, P2 FAIRFIELD |
Booster 3 |
12.5 V |
P3 MTN-1, P3 BRN RCH-2 |
Booster 4 |
12.6 V |
P4 MTN-2, P4 BRPORT, P4 SIA RND, P4 STK STN |
Booster 1 |
Booster 2 |
Booster 3 |
Booster 4 |
Click here to continue reading...
The trolley automation has been running (more or less) since I made this video back in November 2023:
The software part of the automation with the SDB on the ESP32 and the link with JMRI and RTAC works fairly well. The problems that arise are fairly mechanical. The Bowser streetcar is quite finicky and often does not stop running.
The trolley automation also regularly fails because the trolley gets stuck on the one turnout in that little spur where it is running back and forth:
That looks like one of these old Atlas turnouts where the turnout frog is not powered. We have a few of these around, especially in the yards. This is the assumption. It needs to be verified by checking the power routing on that turnout.
Assuming it’s that case, what are the possible solutions?
Click here to continue reading...
I have had reports from Saturday Operators of trains slowing up and down when leaving the yard, not maintaining constant speed. I’ve personally seen that too when trying the newly fixed UP Walthers engine a few days before. Then a few minutes later, everything was acting normally in both cases.
One possibility would be dirty track. The pads of the track cleaning train are filthy and haven’t been changed in a while. However that would not explain why the issue goes away after a short time.
The other possibility is an electrical issue. What we need is a way to measure the track voltage and see if it changes. I don’t have a RRampMeter at hand for the task, yet we can easily replicate that using scrap components I have around already.
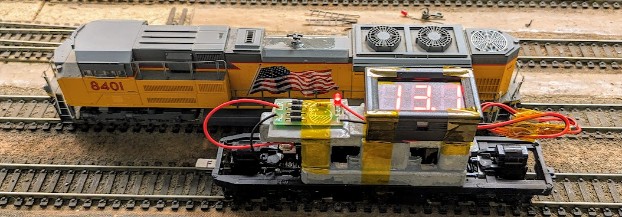
Thus, I made a “voltmeter car” to display the track voltage:
What you’re looking at in the picture above is a donor chassis from an old DC engine, and a few components I had at home: a “full” bridge rectifier (I removed the smoothing capacitor) connected to the track power pickups, and on top a basic voltmeter display. The idea is to measure the peak of the DCC signals as if it were a DC one, which should be more accurate than a multimeter in AC mode (we’re not doing AC Vrms here).
Click here to continue reading...
The little saga with the new Walthers Mainline SD70ACe continues for UP 8312.
Back in January, I got the replacement motors sent by the Walthers’ customer support representative. I finally got around to replacing the motor in 8312. The design of the Walthers engine is not too bad in that regard except that I noticed a few of the wires easily get stuck between the circuit board and the plastic shell, which tends to break their insulation. Thus one would have to be very careful when opening/closing that engine repeatedly.
Click here to continue reading...


